Radically Natural Recipe: Roast Turkey in Less Than One Hour!
I roast a fair amount of turkeys throughout the year...they are not simply Thanksgiving fare around here! We don't eat commercial cold cuts, and we don't eat chicken as a general rule, so home-cooked turkeys are on the monthly food prep routine.
I love the smell of a roasting turkey. I love eating turkey. But I do not love struggling over the turkey to cook it, so I was thrilled when I discovered the "under an hour" turkey roasting technique. Maybe this is new to only me, but I tried it, was impressed with it, and wanted to share.
We found a local source of organic pastured turkeys, purchased a handful of them and put them in the freezer. I roast a turkey a month (hoping to do twice a month when we get more) and use the meat for sandwiches, soups, curries...whatever strikes my fancy. I use the carcass to make bone broth...so many nourishing meals from one bird! And anything that makes the process easier is a boon, so now to the technique:
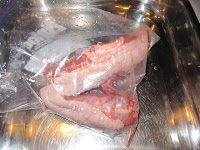 The first step is to remove the backbone of the turkey. That may take a bit of practice and slight force to get through some of the bony parts, but it isn't too difficult. Save the backbone for stock.* [After you have roasted your turkey and removed most of the meat from the bones, add the carcass to the backbone to make broth. You'll get a nice amount of meat from the backbone and perhaps the carcass to keep for soup or another recipe.]
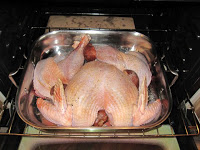 Next, you need to flatten the bird. This step requires a bit of leverage and more strength. (Having hubby help is nice...we did an 18 lb. bird so it required more upper body strength than I had to offer that day.) You will hear bones crack...keep going. You are trying to get it as flat as you can, spreading the breasts out. By exposing as much surface area as possible, you are speeding the cooking process. That is the key to this technique.
Finally, place the bird in your roasting pan or any baking dish in which it will fit. Try to tuck the legs and wings closely to the body, even protecting the breast a bit if possible. Rub the skin with butter or olive oil, sprinkle with sea salt and ground pepper, and tuck garlic cloves all over the bird and into its legs, wings, crevices. I also put some cut apples and pears in the pan and tucked into the hollows of the bird.
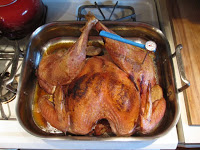 Roast at 450 degrees (of course, you preheated the oven even though I didn't mention it, LOL). Check the bird in 20 minutes; baste if you desire...I didn't bother. You can turn the heat down to 400, but I left it at 450. Check again in 15 minutes to see if the bird is done. Cooking times vary based on size of bird. My bird cooked completely in about 50 minutes. Use an instant read thermometer to assess roasting completion...it should read 160 to 165 degrees in the thigh (the bird continues to cook once removed from oven, so don't cook it to death, LOL) and when pierced, the bird's juices should run clear. [I checked temp at 35 minutes into roasting, and the juices were pink and temp was 130ish...so I kept cooking and checking every 5 to 7 minutes.]
The following links walk you through this process with pictures, video and directions:
Bittman's 45-minute Turkey
Martha Stewart Cutting Out Backbone
*If you are not familiar with making your own bone broths, you definitely want to begin doing so. Bone broths are a highly nourishing food and easy to make. Nourishing Traditions by Sally Fallon is a good place to start learning more about bone broths.
I make broth by using meat bones (in this case, the turkey bones/carcass) , covering with filtered water, adding a generous dash of apple cider vinegar (this helps to draw the calcium and other minerals out of the bones), sea salt, roughly cut onions, garlic, carrots, celery, fennel (bulb and fronds), sometimes apples, and whatever herbs strike my fancy. Play around...you'll discover what fun creating real healing food can be.
Simmer the stock for 12-24 hours. I start mine in the evening and allow it to simmer overnight and check it in the morning. After it is cooled, remove the large parts and strain the broth into another bowl or pot (if I have a small batch of stock, I strain into a large glass pitcher). Pick through the remaining meat and store for future. You can pour the stock into canning jars and freeze IF you leave enough headroom, which is an inch or so. You can also pour into ice cube trays and freeze, which makes convenient amounts of easily usable broth...this is my favorite method for "last minute" recipes for which I need broth but did not plan ahead to thaw an entire jar.
Bon appetit!
I love the smell of a roasting turkey. I love eating turkey. But I do not love struggling over the turkey to cook it, so I was thrilled when I discovered the "under an hour" turkey roasting technique. Maybe this is new to only me, but I tried it, was impressed with it, and wanted to share.
We found a local source of organic pastured turkeys, purchased a handful of them and put them in the freezer. I roast a turkey a month (hoping to do twice a month when we get more) and use the meat for sandwiches, soups, curries...whatever strikes my fancy. I use the carcass to make bone broth...so many nourishing meals from one bird! And anything that makes the process easier is a boon, so now to the technique:
Finally, place the bird in your roasting pan or any baking dish in which it will fit. Try to tuck the legs and wings closely to the body, even protecting the breast a bit if possible. Rub the skin with butter or olive oil, sprinkle with sea salt and ground pepper, and tuck garlic cloves all over the bird and into its legs, wings, crevices. I also put some cut apples and pears in the pan and tucked into the hollows of the bird.
The following links walk you through this process with pictures, video and directions:
Bittman's 45-minute Turkey
Martha Stewart Cutting Out Backbone
*If you are not familiar with making your own bone broths, you definitely want to begin doing so. Bone broths are a highly nourishing food and easy to make. Nourishing Traditions by Sally Fallon is a good place to start learning more about bone broths.
I make broth by using meat bones (in this case, the turkey bones/carcass)
Simmer the stock for 12-24 hours. I start mine in the evening and allow it to simmer overnight and check it in the morning. After it is cooled, remove the large parts and strain the broth into another bowl or pot (if I have a small batch of stock, I strain into a large glass pitcher). Pick through the remaining meat and store for future. You can pour the stock into canning jars and freeze IF you leave enough headroom, which is an inch or so. You can also pour into ice cube trays and freeze, which makes convenient amounts of easily usable broth...this is my favorite method for "last minute" recipes for which I need broth but did not plan ahead to thaw an entire jar.
Bon appetit!